When migrating to a new cloud WAF platform, there’s typically lots of planning that goes into the final production cutover. The new F5 Distributed Cloud Services makes it trivial to migrate your web applications to the new F5 Distributed Cloud Services – getting your apps in path and protected quickly with a basic negative security policy. Compared to other platforms out there – documentation is readily available, linked in the correct places, and the configuration doesn’t try to obfuscate basic features behind vendor terminology.
If you know us by now, you know we don’t endorse technology we can’t get behind and use ourselves, and the verdict is in – we love F5’s new cloud services! We love them so much we decided to start migrating to the platform ourselves for Web application and API security.
We put together this post so you could see firsthand how easy it is to get your website security migrated over to the new F5 cloud WAAP solution. In this article, we’re going to cover a basic setup of F5’s Web Application & API Protection (WAAP) solution – focusing on WAF/HTTP protection. In the next article, we’ll dive deeper into protecting APIs.
How to buy F5 cloud services through their distributed cloud services platform
Before we get going, it’s important to mention; while you can log in and register directly with F5’s website, F5 is still embracing its channel partners! You can buy all the F5 Distributed Cloud Services through WorldTech IT at a discount vs the website directly at retail costs. You’ll of course also receive the expert guidance you’ve come to expect from WorldTech IT through your whole F5 cloud journey. Contact us at any time for a deep dive demo or just a quick chat to learn more about the F5 Distributed Cloud Services available today.
Web App & API Protection – F5’s Cloud WAF, API, and Bot security rolled into one offering
While F5 offers various cloud services, the first product we’re using internally here at WorldTech IT is their Web App & API protection services. What’s awesome about this solution is it combines next-level WAF protection and API protection in one service – pretty slick.
Before you can start to protect your first application, there are some things you should consider, including some dependencies. You will need an account before you get started, but you’ll also want to plan out which components you wish to consume for your application. This is important as each component is attached on top of the HTTP Load Balancer that will act as the front door to your app.
Some services you should consider running for your application, in addition to an App Firewall (WAF) Policy, are listed below. To get the most out of the platform, you should at a minimum deploy ML/AI detection and IPI/IP Reputation. We’ll get into more detail in a future article, but just trust us for now – you want it😉.
- Machine Learning / Artificial Intelligence (ML/AI) Detection
- User Behavioral Analysis – Correlates user activity to identify bad actors better
- Timeseries Analysis – Allows for alerting when application traffic patterns deviate from the norm, such as when under a DDOS attack
- API Discovery – This feature is super helpful and allows for the use of ML to discover and document APIs
- Per API Request Analysis – Leverages AI to model API request behavior and alert when a request deviates from this model
- IP Intelligence Categories –IPI is awesome for cutting down bad actors right up front. Subsequently, it saves you money on bandwidth and processing power on downstream servers
- IP Reputation Score – IPR is linked to IPI and participates in cutting down on those bad actors
- TLS Fingerprinting – TLS Fingerprinting – Beef up your DDoS protection by identifying clients / bad actors that could be part of botnets. The platform extracts certain parameters from the TLS client requests, aka “ClientHello” and compares them with a predefined or customized set of fingerprints to better identify attack patterns.
- BOT Defense – Uses JS insertion, WAF Policies handle Signature based BOT Detection
- For the purposes of this article, we will discuss the most common configuration, which is an HTTP load balancer with a WAF policy riding on top of it.
F5 has done an excellent job of laying out the config builder into three basic concepts:
- Creating an App Firewall Configuration (WAF Policy)
- Attach the App Firewall to a Load Balancer
- You will need to ensure that you’ve created an origin pool for your backend application
- You will then need to create the load balancer and attach your App Firewall policy
- Monitoring WAF operation
- You should ensure that you see data in the Security and Performance monitoring dashboards for your new Load Balancer
Creating a WAF Policy – App Firewall Configuration Components
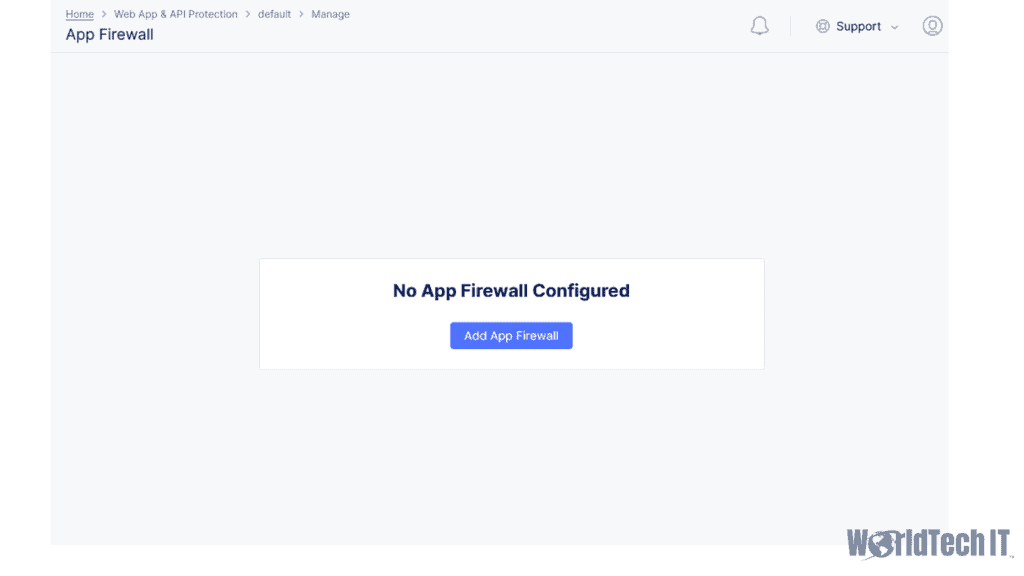
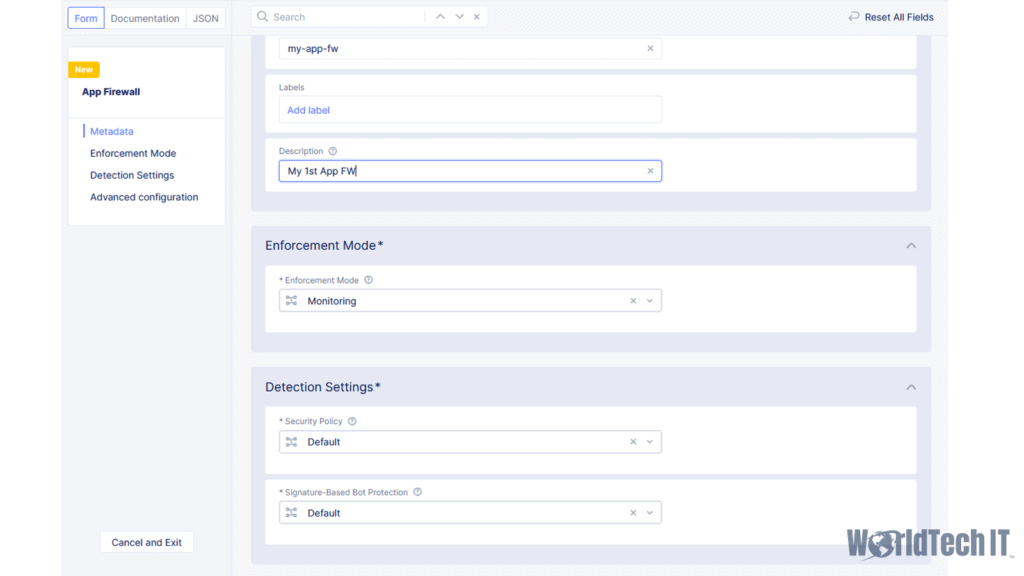
The 1st step to getting the App Firewall policy created will be to navigate to the Web & API Protection section of the F5 Cloud Console. Ensure you are in the desired namespace (Default if you do not wish to use namespace isolation), and then click “Add App Firewall.” From here, you can start defining your policy which will default to “Monitoring.” If you’ve configured a WAF before, Monitoring is akin to “Transparent.” The F5 Default Policy type will apply all signatures, threat campaigns, and uses a ML engine to perform policy tuning. It will also default to having the F5 Default BOT Signature detection configuration – which blocks malicious bots, alarms/logs for good and suspicious traffic.
Creating your Origin Pool
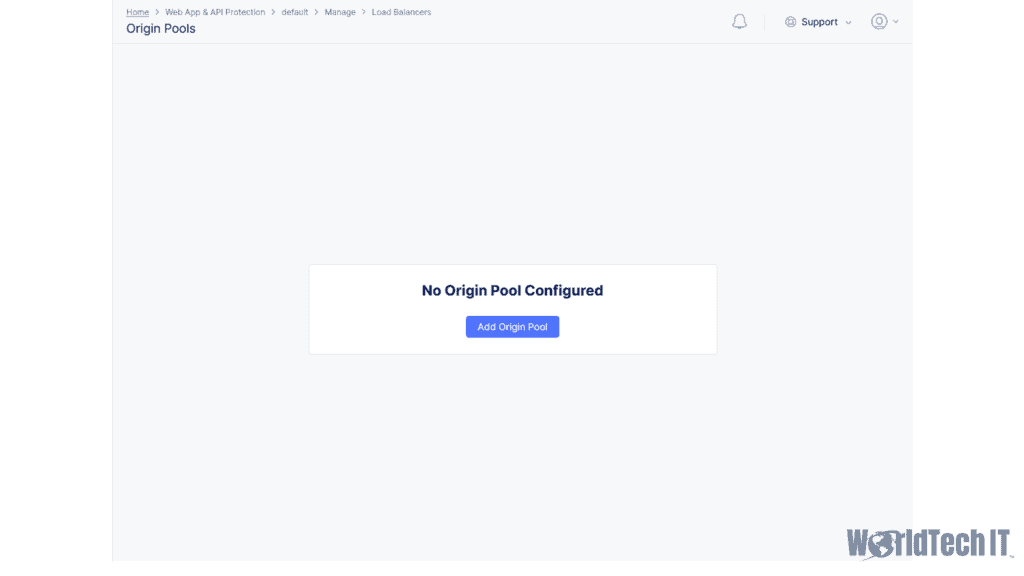
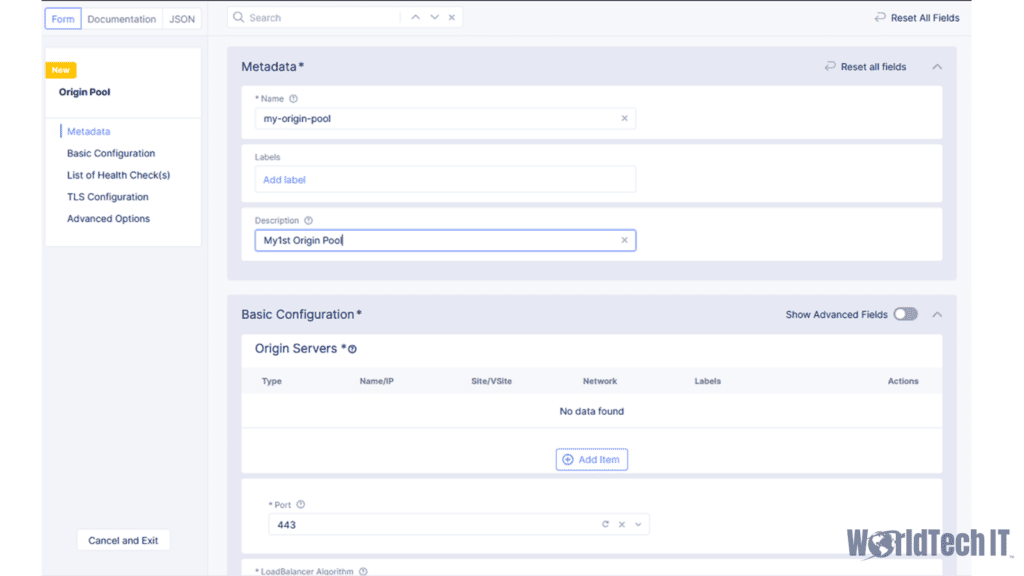
Before you can create a load balancer to front your traffic, you must create an origin pool that defines your backend server(s). This can be as simple as public IP that will be restricted to F5 Cloud source IPs. It can also be as complex as leveraging a VPN tunnel, Direct Private Link, or services running on the VoltStack K8s platform. For the purposes of this article, we will assume that a public endpoint will be used, much like when using F5’s previous cloud WAF, Enterprise App Protect (EAP). This is accomplished by going to the Origin Pools section under the Load Balancer navigation object from within the Web & API Protection section of the Cloud Console. Once there, you can define your Origin configuration that will be leveraged by the HTTP Load Balancer, including any Origin health checks that are desired. More than one Origin pool can be leveraged should you want to have a fallback pool in case your main origin is down. You can also direct traffic to specific origin pools using routes, or balance between multiple origin pools for your application.
Creating your Load Balancer
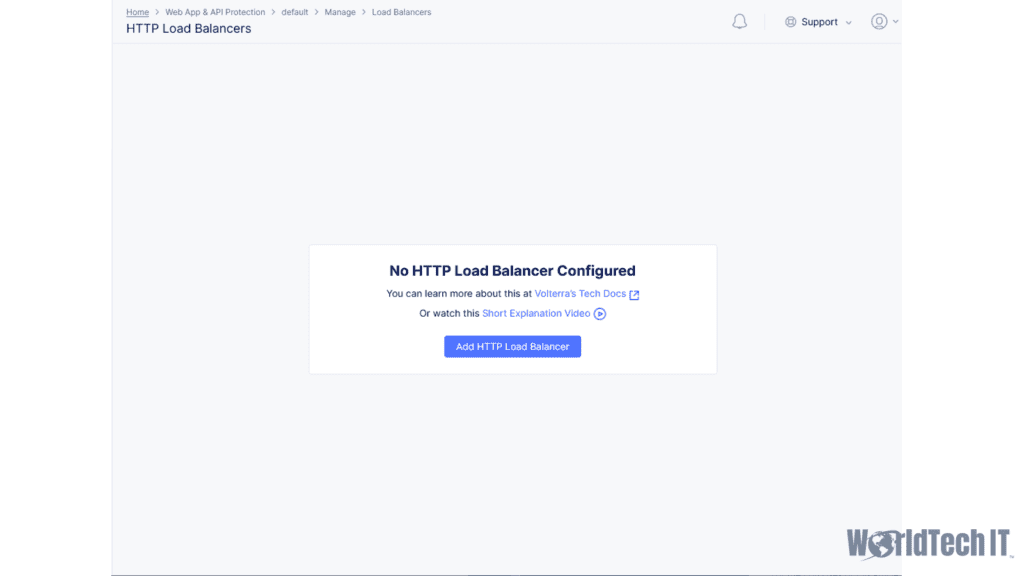
Once you have an Origin Pool defined, you can now create your Load Balancer and attach your App Firewall policy to begin inspecting traffic. This is accomplished by going to the HTTP Load Balancer section within the load balancer navigation object that was mentioned above. Once here, you will click on add HTTP load balancer to start the creation process.
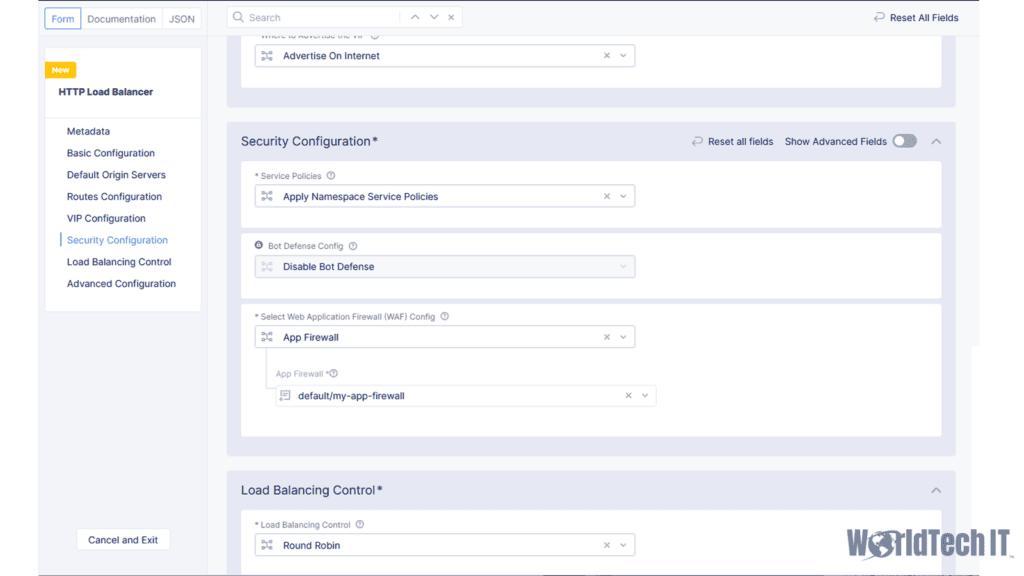
In the following configuration screen, you will need to define:
- Expected hostnames the Load Balancer will process
- Type of Load Balancer – i.e., HTTP vs HTTPS with or without an F5 managed certificate
- Service policies that are to be applied – this is where IPI, IPREP, and TLS fingerprinting can be applied
- BOT defense policy if desired
- WAF Policy that we created earlier
- Load balancing method used, which includes persistence configurations should you have multiple origins in play).
There is also a section for advanced configuration, which we will dive deeper into in a future article. For now, we will skip it in the context of getting a basic WAF policy going.
Monitoring WAF Operation and Tuning
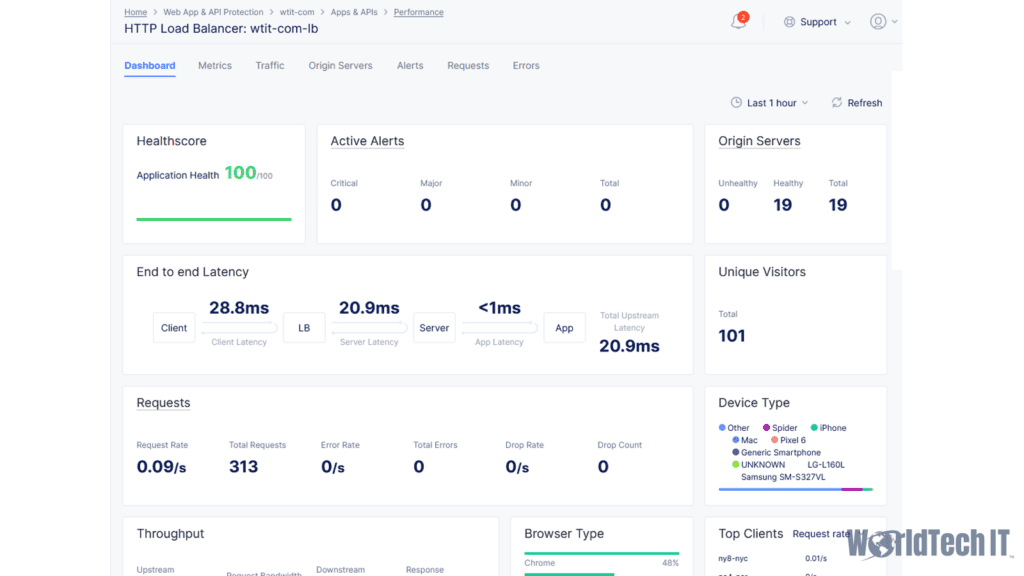
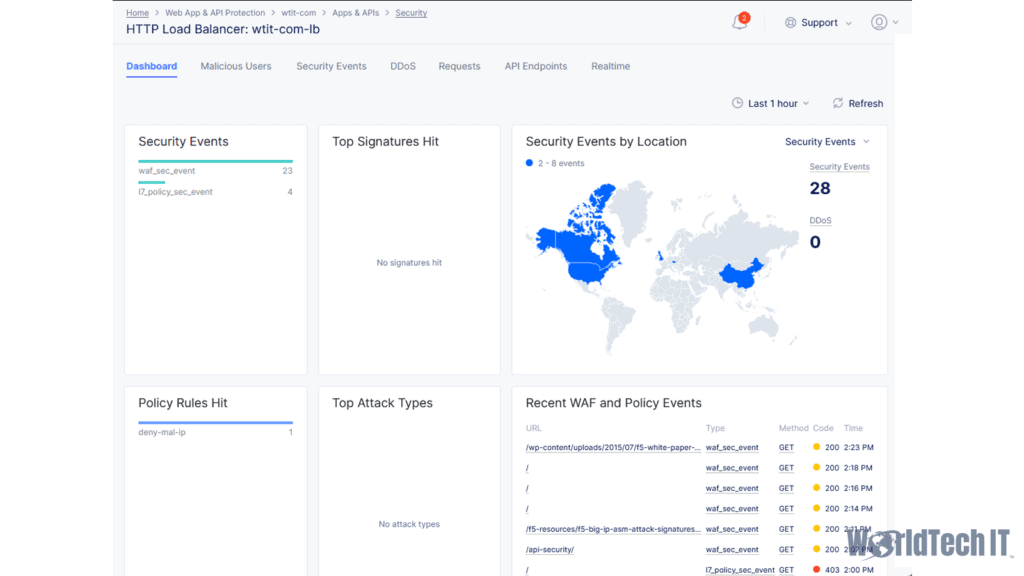
Once you have your application working through the Load Balancer with its applied WAF policy, you should confirm that the Performance and Security dashboards are populating data under the Apps & API’s navigate section. This is critical as you will use this data to perform any required manual tuning of the policy, as well as watch for false positives as you test your application.
Moving the WAF into Blocking
Depending on the traffic volume, this should normalize after approximately two weeks. At that time, you can go into your App Firewall configuration and change the policy to blocking, which starts mitigating threats. In instances where you need protection immediately, you can leverage our professional services engineers to craft a customized, manual policy to go straight into blocking the most egregious violations. Meanwhile, a more comprehensive policy is created on a separate testing load balancer configuration to provide the full protection possible from the service.
Conclusion
The verdict is in – F5’s distributed cloud services are a hit. We love what we see from the platform, and it was indeed worth the wait. We are super excited for what the future holds for F5’s cloud as the already impressive services advance and evolve.
All Services Currently offered via F5’s Cloud offering – “Distributed Cloud Services”
Cloud & Edge Sites – Deploy nodes in the cloud or edge for networking, security, or K8s services.
DNS Management – Configure and manage primary or secondary DNS services.
Load Balancers – Create and manage HTTP & TCP Load Balancers on nodes in cloud or edge locations.
Web App & API Protection – Create a proxy and configure WAF, Bot, and API security services for your apps.
DDoS & Transit Services – Secure your infrastructure and apps against L3/L4 DDoS attacks.
Distributed Apps – Deploy apps in our global PoPs (REs) or your cloud/edge sites
Audit Logs & Alerts – Review logs and manage alerts
Application Traffic Insight – Recognize and monitor all client devices that access your applications
Client-Side Defense – Monitor and mitigate fraudulent app requests at the client devices
Account Protection – Reduce online fraud against web and mobile applications
Authentication Intelligence – Identify returning/known users and reduce authentication friction


Leave a Reply